
What Is a Web Server ?
Web server is a server that hosts an application that listens to the HTTP requests.
It is the web server’s responsibility to hear (i.e., to understand HTTP) what the browser is saying , and respond appropriately.
Sometimes, it could be as simple as fetching a file from the file system and delivering it to the web browser.
At other times, it delegates the request to a handler that performs complicated logic and returns the processed response to the web server, which in turn transfers it back to the client.
Typically, the server that hosts web server software is termed a web server or a web front-end server .
Although there are quite a few web servers around, three dominate: Apache , Microsoft Internet Information Services (IIS) , and Nginx combined have captured around 85 percent of the market.
Reasons Why You Should Be Using Nginx ?
It’s Affordable to Install and Maintain:
Nginx performs pretty well even on servers with a very low hardware footprint. Even with default settings, you can get much more throughout from an Nginx server compared toApache or IIS .
It’s Easy to Use:
Don’t be intimidated by the lack of a user interface (UI) . Nginx is easy if you understand how to use it. The configuration system is pretty well thought out and once you get up to speed, you will thoroughly enjoy it!
You Can Upgrade It On the Fly:
Nginx provides you an ability to reconfigure and upgrade Nginx instances on the fly without interrupting customer activity.
With Nginx you can patch your production environment reliably without completely bringing down your services levels.
It’s Fast:
Fast page load times builds trust in your site and leads to more returning visitors.
It Can Accelerate Your Application:
The idea is to drop Nginx in front of an existing set of web servers and let it take care of routing traffic to the back end intelligently. This way, you can offload a lot of tasks to Nginx and let your back-end server handle more data intensive tasks.
It Has a Straightforward Load Balancer:
Setting up a hardware load balancer is quite costly and resource intensive.
With Nginx you can set up a pretty straightforward and fast software load balancer. It can immediately help you out by sharing load across your front-end web servers.
It Scales Well:
With Apache and IIS , it is a common pain: The more connections, the more issues. These servers solved a big problem around bringing dynamic content to the web server instead of static files, but scalability has always been a challenge.
Let’s say you have server that can handle 1000 concurrent connections . As long as the requests are short and the server is able to handle 1000 connections/second, you are good.
If you have large files available for download, your server will most likely choke with a high number of concurrent connections. Apache and IIS servers are not suitable for this kind of load, simply because of the way they have been architected.
They are also prone to denial of service attacks (DoS) .
Nginx is one of the very few servers (along with Node.js) that is capable of addressing this issue, which is often referred to as C10K problem.
Main Features of Nginx
More Than Just a Web Server: At its core, you can consider Nginx to be an event-based reverse proxy server . That may come as a surprise to many, because mostly Nginx is usually said to be a web server. A reverse proxy is a type of proxy server that retrieves resources from the servers on behalf of a client. It can be helpful to offload the number of requests that the actual web server ends up handling. Figure 1-2
illustrates what a proxy server does.
Modular Design: Nginx has a fairly robust way of upgrading its live processes and it can be done without interrupting the service levels.
Asynchronous Web Server: Nginx gains much of its performance due to its asynchronous and event-based architecture whereas Apache and IIS like to spin new threads per connection, which are blocking in nature. Both IIS and Apache handle the threads using multithreaded programming techniques . Nginx differs in the approach completely. It does not create a separate thread for each request. Instead it relies on events.
Reverse Proxy and Load Balancing Capability: Nginx analyzes the request based on its URI and decides how to proceed with the request. In other words, it is not looking at the file system to decide what it has to do with it. Instead, it makes that decision based on the URI. This differentiation enables Nginx to act as a very fast front end that acts as a reverse proxy and helps balance the load on the application servers. It’s no exaggeration to say that Nginx is a reverse proxy first and a web server later.
Low Resource Requirement and Consumption: Small things that go a long way, define Nginx. Where other web servers typically allow a simple plug-and- play architecture for plug-ins using configuration files, Nginx requires you to recompile the source with required modules. Every module that it requires is loaded directly inside of an Nginx process. Such tweaks along with smart architectural differences ensure that Nginx has a very small memory and CPU footprint on the server and yields a much better throughput than its competition. You will learn about the Nginx architecture with granular details in the coming chapters.
Unparalleled Performance: Nginx is probably the best server today when it comes to serving static files. There are situations where it cannot be considered the best (like dynamic files), but even then, the fact that it plays well as a reverse proxy ensures that you get the best of both worlds. If configured well, you can save a lot of cost that you typically incur on caching, SSL termination, hardware load balancing, zipping/unzipping on the fly, and completing many more web-related tasks.
Multiple Protocol Support: HTTP(S), WebSocket , IMAP , POP3 , SMTP: As a proxy server, Nginx can handle not only HTTP and HTTPS requests, but also mail protocols with equal grace. There are modules available that you can use while compiling your build and Nginx will proxy your mail-related traffic too.
SSL Termination: Secure Sockets Layer is a necessity for any website that deals with sensitive data. And, just like any other necessity, there is a cost involved. When it comes to web traffic, SSL also induces an extra processing overhead on the server side where it has to decrypt the request every time. There lies a catch-22 situation: If you remove the SSL, you are opening yourself up for attacks and if you use SSL, you end up losing a little bit on speed.
Since Nginx has the capability of acting as a load balancer, you can give it additional work as well. Essentially, the idea of an SSL termination is that the request will come to the load balancer on a secure channel but will be sent to the other web servers without SSL. This way, your web server acts faster and eventually your requests go out to the clients in a secure manner as well.
HTTP Video Streaming Using MP4/FLV/HDS/ HLS: ou have already learned that the Input/Output (IO) in Nginx doesn’t block if the client is slow. Video
streaming is typically a very IO-intensive process, and Nginx does a great job here. It has multiple modules that help you provide streaming services. To give a little perspective as to what is special about video streaming, imagine watching YouTube. You can easily skip the video from one position to another and it almost immediately starts serving the content. The key here is to not download the entire file at one shot. The request, hence, should be created in such a way that it has certain markers in the query string, like this:
http://www.yoursite.com/yourfile.mp4?start=120.12
The preceding request is asking the server to send the content of yourfile.mp4 starting from (notice the start query string) 120.12 seconds. This allows random seeking of a file in a very efficient way.
Extended Monitoring and Logging: The more servers you have, and the more traffic you get, the harder it becomes. There are all sorts of nasty
people out there who have ulterior motives to bring the website down and disrupt your web service. The best wayto ensure safety, hence, is to be cautious and alert. Log as much as possible and ensure that you react proactively .
Graceful Restarting: The way Nginx is designed, you can easily upgrade Nginx. You can also update its configuration while the server is running, without losing client connections. This allows you to test your troubleshooting approach , and if something doesn’t work as desired, you can simply revert the settings.
nginx
-s reload , a command that will simply reload the configuration changes without recycling the worker processes.
Upgrades without Downtime Using Live Binaries: This is probably one of the most powerful features of Nginx. In the IIS or Apache worlds, you can’t upgradeyour web server without bringing the service down. Nginx spawns a master process when the service starts. Its main purpose is to read and evaluate configuration files. Apart from that, the master process starts one or more worker processes that do the real work by handling the client connections.
If you need to upgrade the binary, there are simple steps and commands that you need to issue in order to make the new worker processes run at tandem with the older ones. The new requests will be sent to the newer worker processes that have the latest configuration loaded in it. If by any chance, you find out that the upgrade is causing issues, you can simply issue another set of commands that will gracefully return the requests to the older process that already has the previous working configuration loaded in it.
Enterprise Features of Nginx Plus: Nginx has two versions. The basic version is free, and the paid option is called Nginx Plus . Nginx Plus has
quite a few important features that are very helpful for managing busy sites. Choosing Nginx Plus helps you save a lot of time. It has features like load balancing, session persistence, cache control, and even health checks out of the box.
Differences between Apache and Nginx:
Nginx and Apache are both versatile and powerful web servers. Together they serve more than 70 percent of the top million websites. At times they compete, but often they are found complementing each other. One important thing to point out here is that they are not entirely interchangeable. You will need to pick them up carefully according to your workload.
Performance: For Apache users, there is a choice of multiprocessing modules (MPM) that control the way the requests are handled. You can choose between mpm_prefork, mpm_worker, mpm_event . Basically mpm_prefork spawns processes for every request, mpm_worker spawns processes , which in turn spawn threads and manages the threads, mpm_event is further optimization of mpm_worker where Apache juggles the keep alive connections using dedicated threads. If you haven’t already noted, these changes are all for the better and evolutionary. Nginx was created to solve the concurrency problem and it did by using a new design altogether. It spawns multiple worker processes that can handle thousands of connections each! It is completely asynchronous, non-blocking, and event-driven. It consumes very little resources and helps in reducing cost of scaling out of a web server. The web server can be upgraded on the fly without losing the connected visitors and reduces downtime of your service.
Resource Requirements: Nginx needs fewer resources than Apache because of its new architecture. Fewer resources = Lower cost = More profit.
Proxy and Load Balancing Server: Nginx was designed as a reverse proxy that doubles up as a web server. This is quite different than Apache
since it was designed as a general purpose web server. This feature gives an edge to Nginx since it is more effective in dealing with a high volume of requests. It also has good load balancing capability. Quite often, Nginx acts as a web accelerator by handling the request in the front end and passing the request to the back-end servers when required. So, Nginx in the front end and Apache in the back end gives you the best of both worlds. They are more complementing than competing from this perspective.
Static vs. Dynamic Content: Nginx has a clear advantage when serving static content. The dynamic content story is quite different though. Apache has a clear, early mover advantage here. It has built-in support for PHP, Python, Perl, and many other languages. Nginx almost always requires extra effort to make it work with these languages. If you are a Python or Ruby developer, Apache might be a better choice since it will not need CGI to execute it. Even though PHP has good support on Nginx, you still need to dedicate a little time to get PHP- based solutions that work directly on Nginx. For example, installing WordPress on LAMP stack is super easy, and even though it can be easily done on a LEMP stack, you will still need to configure some nuts here, and some bolts there.
Configuration: Apache’s basic configuration ideology is drastically different from Nginx. You can have a .htaccess file in every directory (if you like) using which you can provide additional directions to Apache about how to respond to the requests of that specific directory. Nginx on the other hand interprets the requests based on the URL, instead of a directory structure. It doesn’t even process the .htaccess file. It has both merits (better performance) and demerits (lesser configuration flexibility). Although for static files the requests are eventually mapped to the file, the core power of parsing the URI comes to play when you use it for scenarios like mail and proxy server roles.
Modules (or Plug-Ins): Both Apache and Nginx have a robust set of modules that extend the platform. There is still a stark difference in the way these extensions are added and configured. In Apache, you can dynamically load/unload the modules using configuration, but in Nginx you are supposed to build the binaries using different switches. It may sound limiting and less flexible (and it is), but it has its own advantages. For example, the binaries won’t have any unnecessary code inside it. It requires and forces you to have a prior understanding of what you need the specific web server to do.
It is also good in a way, because mostly it is seen that even though the modular software has modules, web administrators end up installing much more than what they need. Any unnecessary module that is loaded in the memory is extra CPU cycles getting wasted. Obviously, if you are wasting those cycles due to lack of planning, it all adds up eventually and you will get poorer performance from the same hardware!
Nginx Core Directives
What Are Directives?
“Directive” is defined as an instruction or to direct. Directives define how Nginx runs on your server. Directives are of two types: simple directives and block directives.
Simple directive – A simple directive can be as straightforward as a set of names and parameters separated by spaces, and ending with a semicolon. For example, the directive for worker processes looks like this: worker_processes 1;
This directive is giving direction to the master process of Nginx about how to spawn worker processes.
Block directive – As the name suggests, it looks like a block of text enclosed by curly braces { } and contains a set of simple directives.
Context Types
There are quite a few different contexts available in Nginx: for example, main, events, HTTP, server, location, upstream, if, stream, mail, etc. Out of these, HTTP, events, server, and location are most commonly used. The contexts could be nested as well.
main {
simple_directives parameters;
…
events{
event_directives parameters;
…
}
http{
http_directives parameters;
…
server{
server_directives parameters;
…
location{
location_directives parameters;
…
}
}
}
}
###########################################
Understanding the Default Configuration
[root@localhost ~]# cat /etc/nginx/nginx.conf
# For more information on configuration, see:
# * Official English Documentation: http://nginx.org/en/docs/
# * Official Russian Documentation: http://nginx.org/ru/docs/
user nginx;
worker_processes auto;
error_log /var/log/nginx/error.log;
pid /run/nginx.pid;
# Load dynamic modules. See /usr/share/nginx/README.dynamic.
include /usr/share/nginx/modules/*.conf;
events {
worker_connections 1024;
}
http {
log_format main ‘$remote_addr – $remote_user [$time_local] “$request” ‘
‘$status $body_bytes_sent “$http_referer” ‘
‘”$http_user_agent” “$http_x_forwarded_for”‘;
access_log /var/log/nginx/access.log main;
sendfile on;
tcp_nopush on;
tcp_nodelay on;
keepalive_timeout 65;
types_hash_max_size 2048;
include /etc/nginx/mime.types;
default_type application/octet-stream;
# Load modular configuration files from the /etc/nginx/conf.d directory.
# See http://nginx.org/en/docs/ngx_core_module.html#include
# for more information.
include /etc/nginx/conf.d/*.conf;
server {
listen 80 default_server;
listen [::]:80 default_server;
server_name _;
root /usr/share/nginx/html;
# Load configuration files for the default server block.
include /etc/nginx/default.d/*.conf;
location / {
}
error_page 404 /404.html;
location = /40x.html {
}
error_page 500 502 503 504 /50x.html;
location = /50x.html {
}
}
# Settings for a TLS enabled server.
#
# server {
# listen 443 ssl http2 default_server;
# listen [::]:443 ssl http2 default_server;
# server_name _;
# root /usr/share/nginx/html;
#
# ssl_certificate “/etc/pki/nginx/server.crt”;
# ssl_certificate_key “/etc/pki/nginx/private/server.key”;
# ssl_session_cache shared:SSL:1m;
# ssl_session_timeout 10m;
# ssl_ciphers HIGH:!aNULL:!MD5;
# ssl_prefer_server_ciphers on;
#
# # Load configuration files for the default server block.
# include /etc/nginx/default.d/*.conf;
#
# location / {
# }
#
# error_page 404 /404.html;
# location = /40x.html {
# }
#
# error_page 500 502 503 504 /50x.html;
# location = /50x.html {
# }
# }
}
###################################################
Simple Directives
The whole body could be referred to as the main context. There are a few simple directives defined in the main block:
user directive has a default value of nobody. You can add user directive to define the account under which Nginx worker process will be executed on the server. The syntax for user directive is like user <user_name> <group_name>. The user should exist on the server before Nginx starts or else there will be an error while starting Nginx services.
worker_process directive has a default value of 1 and it implies the number of worker processes that will be spawned by Nginx. Setting the value to auto is also permitted and in that case Nginx tries to autodetect the number of cores.
error_log directive can be applied in multiple contexts like main, http, mail, stream, server, and location. Here, you see it applied in the main context. The first parameter /var/log/nginx/error.log tells you the the name of the file where the log file will be created, whereas the second parameter warn informs you that anything above the warning level will be logged.
The logging levels are defined in increasing order as you can see from the list below and it is important to note that if you set the level to error, then the logs of type warning, notice, and info will be ignored. Keeping it to info is not recommended in production since the logs may become massive if your website is hit very frequently.The logs should be periodically analyzed to verify if it contains anything alarming.
• info – Information
• notice – Notice
• warn – Warnings
• error – Error
• crit – Critical
• alert – High Alert
• emerg – Emergency
pid directive has a parameter that defines the file name that stores the process ID of the master process /var/run/nginx.pid. You may be thinking why does nginx log the PID to a file? Glad you asked! Imagine a scenario where you are supposed to check the uptime of a process. Running a command like ps -ax | grep nginx will help you get the current status and process id (PID), but you cannot really tell how long the process has been alive.
[root@localhost ~]# ps -ax | grep nginx
2421 ? Ss 0:00 nginx: master process /usr/sbin/nginx
2422 ? S 0:00 nginx: worker process
2826 pts/0 R+ 0:00 grep –color=auto nginx
[root@localhost ~]# ps -p 2421 -o etime=
55:43
[root@localhost ~]# ps -p `cat /var/run/nginx.pid` -o etime=
57:10
[root@localhost ~]# cat /var/run/nginx.pid
2421
##########################################################
Events Context
After the simple directives in the default configuration, you will find a context called events. The events context can be declared only in the main context and there can be only a single events context defined within the Nginx configuration. With the use of directives in the event context, you can fine-tune the way Nginx behaves. There are just six different event directives.
worker_connections directive allows a maximum of 1024 concurrent worker connections. The defaults in Nginx usually suffice. The number of concurrent connections you may get on a web server can be calculated roughly using the following (N = average number of connections per request): (worker_processes x worker_connections x N) / Average Request Time
use directive does not need to be applied explicitly since Nginx tries to use the most efficient method automatically. Basically, the use directive allows Nginx to support a variety of connection methods depending on the platform.
multi_accept is set to off by default. It means that a worker process will accept only one new connection at a time by default. It is a generally a good idea to enable multi_accept so that Nginx can accept as many connections as possible.
accept_mutex is set to on by default, and it is generally left untouched. Basically, it means that the worker processes will get the requests one by one. This implies that the worker processes will not jump up for every request and go back to sleep if the number of requests is low.
accept_mutex_delay comes into effect only when accept_mutex is enabled. As the name implies it is the maximum time to wait for the existing worker process to accept the new connection before initiating a new process to execute the request.
################################################
HTTP Context
The HTTP context (or block) can be considered the heart of the configuration system for an Nginx web server. In the default configuration you will notice the following directives.
include /etc/nginx/mine.types – The include directive keeps the core configuration file clean. You can use this directive to keep related configurations in a separate file. Nginx will ensure that the file is loaded in-place when loading the configuration. At the same time, it will keep the main configuration readable and manageable.
If you view /etc/nginx/mime.types you will find a block of text that is nothing but another directive called types . It maps file name extension to MIME types of responses. The extensions are case insensitive and there can be many extensions mapped to one type. The following snippet shows the structure of this file. Notice how html htm shtml extensions are all mapped to text/html MIME type.
[root@localhost ~]# cat /etc/nginx/mime.types
types {
text/html html htm shtml;
text/css css;
text/xml xml;
image/gif gif;
image/jpeg jpeg jpg;
application/javascript js;
application/atom+xml atom;
application/rss+xml rss;
.
.
.
.
}
default_type directive has a value of application/octet-stream . It specifies the default MIME type if Nginx fails to find a specific one in the /etc/nginx/mine.types . It is this MIME type that guides the browser that it has to download the file directly.
log_format directive configures the ngx_http_log_module . It writes the log in a specified format. The first parameter is the name of the format, in this case main. The second parameter is a series of variables (you will learn about it in detail soon) that will contain a different value for every request. Once you have named a log_ format , you will need to use it.
log_format main ‘$remote_addr – $remote_user [$time_local] “$request” ‘ ‘$status $body_bytes_sent “$http_referer” ‘ ‘”$http_user_agent” “$http_x_forwarded_for”‘;
access_log directive requires a path ( /var/log/nginx/access.log ) and name of a format ( main ). There is much more to access_log that you will learn in the upcoming chapters, but for now you can simply understand that every request you make from the server can be logged to a file so that you can analyze it later. A good web administrator takes very good care of these logs, and analyzes it periodically to find out issues that sometimes go unnoticed. These logs also prove to be helpful during troubleshooting scenarios.
The default value for sendfile directive is off if the directive is not present. Nginx default configuration hence, turns it on . It is generally a good idea to enable it, since it ensures that the function is called with SF_NODISKIO . In simple words, it means that the call will not block on disk I/O. The data is loaded in chunks and sent appropriately to the client. As you can guess, it has a huge advantage and enables Nginx to scale very well, especially while serving large files.
tcp_nopush directive is commented by default and the default value is off. This comes into effect only when you are using sendfile and basically directs the Nginx server to send the packets in full. Typically, you can leave it disabled.
keepalive_timeout directive has a value of 65. Normally, when a connection is made to the server, you need not disconnect the connection straightaway. That is because a web page normally comprises of a lot of assets. It will not be very effective to create a new connection for every asset that is sent to the client.
gzip directive compresses the output so that lesser bandwidth is consumed per request. By default it is turned off, and it is recommended to turn it on.
The last line in the configuration is yet another include and it is an interesting one! You can see that it accepts wild cards ( include /etc/nginx/conf.d/*.conf; ) and it implies that it will load all the configuration file sat once from the folder /etc/nginx/ conf.d . In the next section you will see what is included in the conf.d folder .
################################################################
Server Context
The server block can be set in multiple contexts to configure various modules.
#################################################################
Nginx Core Architecture
The Master Process: Think of the master process as the owner of the restaurant. The master process of Nginx is the one who performs privileged operations like reading from the configuration files , binding to ports, and spawning child processes when required. The worker processes are almost analogous to waiters in the restaurant. They do the running around and manage the show. Notice that the guests at the restaurant don’t come to visit the owner. They are there to have food that the chefs make in the kitchen. The guests don’t need to know who does the hard work behind the scenes. The chefs work in a dedicated manner to make the dish, and play a role analogous to slow input/output (I/O) or long-running networking calls in this story.
[root@localhost ~]# ps -ef –forest |grep nginx
root 2181 2097 0 10:39 pts/0 00:00:00 \_ grep –color=auto nginx
root 2166 1 0 10:39 ? 00:00:00 nginx: master process /usr/sbin/nginx
nginx 2167 2166 0 10:39 ? 00:00:00 \_ nginx: worker process
[root@localhost ~]# grep worker_processes /etc/nginx/nginx.conf
worker_processes auto;
[root@localhost ~]# vim /etc/nginx/nginx.conf
worker_processes 2;
[root@localhost ~]# ps -ef –forest |grep nginx
root 2210 2097 0 10:42 pts/0 00:00:00 \_ grep –color=auto nginx
root 2166 1 0 10:39 ? 00:00:00 nginx: master process /usr/sbin/nginx
nginx 2195 2166 0 10:42 ? 00:00:00 \_ nginx: worker process
nginx 2196 2166 0 10:42 ? 00:00:00 \_ nginx: worker process
[root@localhost ~]# ps -ax -o command |grep nginx
nginx: master process /usr/sbin/nginx
nginx: worker process
nginx: worker process
grep –color=auto nginx
[root@localhost ~]# grep worker_processes /etc/nginx/nginx.conf
worker_processes 5;
[root@localhost ~]# ps -ef –forest |grep nginx
root 2223 2097 0 10:43 pts/0 00:00:00 \_ grep –color=auto nginx
root 2166 1 0 10:39 ? 00:00:00 nginx: master process /usr/sbin/nginx
nginx 2215 2166 0 10:43 ? 00:00:00 \_ nginx: worker process
nginx 2216 2166 0 10:43 ? 00:00:00 \_ nginx: worker process
nginx 2217 2166 0 10:43 ? 00:00:00 \_ nginx: worker process
nginx 2218 2166 0 10:43 ? 00:00:00 \_ nginx: worker process
nginx 2219 2166 0 10:43 ? 00:00:00 \_ nginx: worker process
Processes vs. Threads: Fundamentally, from the OS perspective, the work is done inside a process using one or many threads. The processes can be considered as a boundary created by the memory space. Threads reside inside a process. They are objects that load the instructions and are scheduled to run on a CPU core. Most server applications run multiple threads or processes in parallel so that they can use the CPU cores effectively. As you can guess, both processes and threads consume resources and having too many of either of them leads to Problem.
Typical web server often creates the pages quickly. Unfortunately, it doesn’t have control on the clients’ network speed. This means that in a blocking architecture the server resources get tied down because of slow clients. Bring a lot of slow clients, and eventually you will find a client that complains that the server is slow. What an irony! Nginx handles the requests in such a way that its resources are not blocked.
The Worker Process: Each worker process in Nginx is single threaded and runs independently. Their core job is to grab new connections and process them as quickly as possible When the worker processes are launched, they are initialized with the configuration and the master process tells them to listen to the configured sockets. Once active, they read and write content to disk, and communicate with the upstream servers.
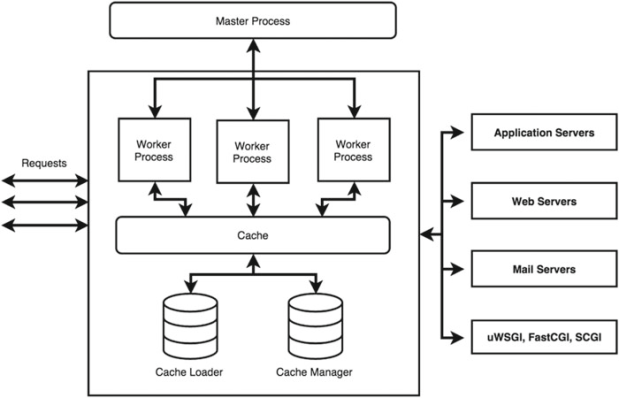
Since they are all forked from the master process, they can use the shared memory for cached data, session persistence data, and other shared resources.
State Machines: Nginx has different state machines . A state machine is nothing but a set of instructions that tell it how to handle a particular request. A HTTP state machine is the most commonly used, but you also have other state machines for processing streams (TCP traffic), mails (POP3, SMTP, IMAP), and so on.
When incoming requests hit the server, the kernel triggers the events. The worker processes wait for these events on the listen sockets and happily assigns it to an appropriate state machine.
Processing an HTTP request is a complicated process and every web server has a different way of handling its own state machines. With Nginx, the server might have to think whether it has to process the page locally, or send it to the upstream or authentication servers. Third-party modules go one step further by bending or extending these rules.
Primarily, one worker process can cater to hundreds (even thousands!) of requests at the same time even though it has just one thread internally. It is all made possible due to the never-ending event loop that is non-blocking in nature. Unlike other web servers (like IIS & Apache), the threads in Nginx don’t wait till the end of the request. It accepts the request on the listen socket, and the moment it finds a new request, it creates a connection socket.
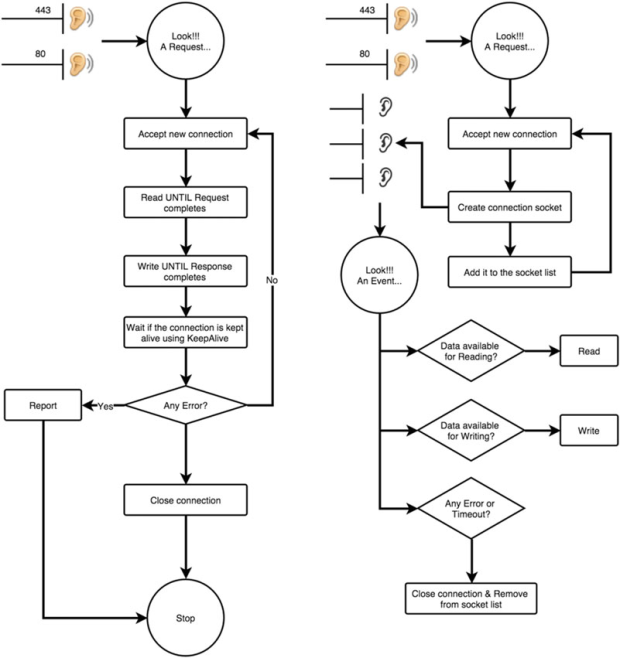
Traditional web server request processing (left) and Nginx (right)
Notice that in the traditional way (Figure, left), the threads or worker process is not freed up until the client consumes the data completely. If the connection is made to stay alive by using the keepalive setting, the resources allocated to this thread/process remains alive until the timeout of the connection. Compare this to Nginx, and you will find that the newly created connection socket keeps listening for the events of the ongoing requests at its own pace. So, the kernel will let Nginx know that the partial data that is sent to the client has been received, and the server can send additional data. This non-blocking event mechanism helps to achieve high scalability on the web server. In the meantime, the listen sockets are free to serve additional requests!
Update Configuration: You just found out that there is an issue with the worker process and the worker process needs to be restarted. Or maybe you just want the worker processes to be aware of the new configuration change you just made. One way would be to kill the worker processes and respawn them so that the configuration is loaded again. Updating a configuration in Nginx is a very simple, lightweight, and reliable operation. All you need to do is run nginx -s reload . This command will ensure that the configuration is correct, and if it is all set, it will send the master process a SIGHUP signal.
The master process obliges by doing two things:
1. It reloads the configuration and forks a new set of worker processes. This means, that if you have two worker processes running by default, it will spawn two more! These new worker processes will start listening for connections and process them with new configuration settings applied.
2. It will signal the old worker processes to gracefully exit. This implies that theolder worker processes will stop taking new requests. They will continue working on the requests that they are already handling, and once done will gracefully shut down after all the connections are closed. Notice that due to new worker processes being spawned, there will be additional load on the server for a few seconds, but the key idea here is to ensure that there is no disruption in service at all.
root@localhost ~]# kill -l
1) SIGHUP 2) SIGINT 3) SIGQUIT 4) SIGILL 5) SIGTRAP 6) SIGABRT 7) SIGBUS 8) SIGFPE 9) SIGKILL 10) SIGUSR111) SIGSEGV 12) SIGUSR2 13) SIGPIPE 14) SIGALRM 15) SIGTERM16) SIGSTKFLT 17) SIGCHLD 18) SIGCONT 19) SIGSTOP 20) SIGTSTP21) SIGTTIN 22) SIGTTOU 23) SIGURG 24) SIGXCPU 25) SIGXFSZ26) SIGVTALRM 27) SIGPROF 28) SIGWINCH 29) SIGIO 30) SIGPWR31) SIGSYS 34) SIGRTMIN 35) SIGRTMIN+1 36) SIGRTMIN+2 37) SIGRTMIN+338) SIGRTMIN+4 39) SIGRTMIN+5 40) SIGRTMIN+6 41) SIGRTMIN+7 42) SIGRTMIN+843) SIGRTMIN+9 44) SIGRTMIN+10 45) SIGRTMIN+11 46) SIGRTMIN+12 47) SIGRTMIN+1348) SIGRTMIN+14 49) SIGRTMIN+15 50) SIGRTMAX-14 51) SIGRTMAX-13 52) SIGRTMAX-1253) SIGRTMAX-11 54) SIGRTMAX-10 55) SIGRTMAX-9 56) SIGRTMAX-8 57) SIGRTMAX-758) SIGRTMAX-6 59) SIGRTMAX-5 60) SIGRTMAX-4 61) SIGRTMAX-3 62) SIGRTMAX-263) SIGRTMAX-1 64) SIGRTMAX
Upgrade: Here instead of spawning new worker processes with new configurations, it starts the newer version of the web server, which shares the resources with the older version. These keep running in parallel and their worker processes continue to handle traffic. If you find that your application is doing well with the newer version, you can send signals to kill the older version or vice versa!
HTTP Request Processing in Nginx: Now that you know the overall architecture of Nginx, it will be easier to understand how a typical request
is served end-to-end. Figure should give you an overall idea about the request processing in Nginx. Consider that you have a website that requires a valid user to access the site and wants to compress every request that is served by the web server. You will see how different components of Nginx work together to serve a request.
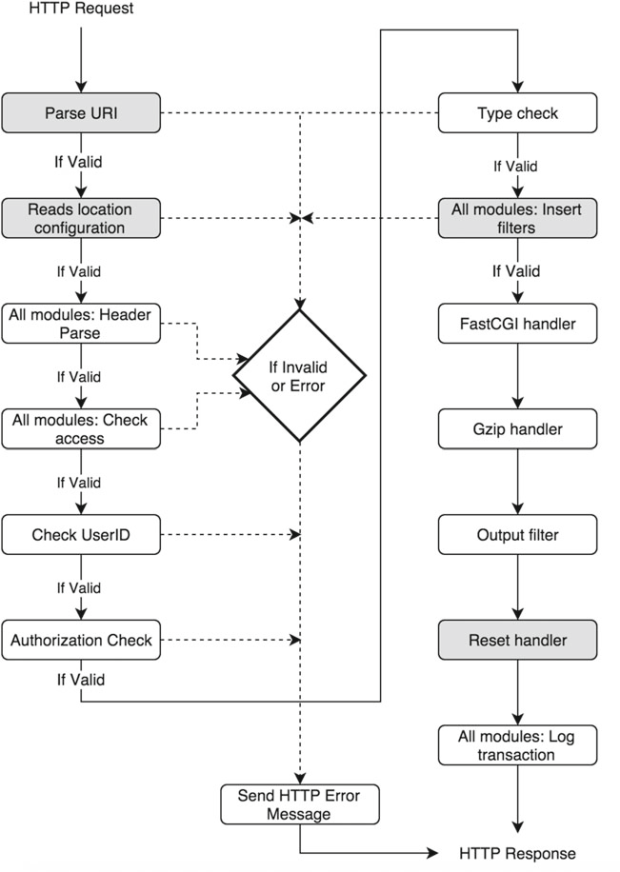
1. After reading the main context from the nginx.conf, the request is passed to http context.
2. The first step is to parse the Request URI to a filename.
3. Read the location configuration and determine the configuration of a requested resource.
4. All modules parse the header and gather module specific information.
5. Checks if the client can access of the requested the resource. It is at this step that Nginx determines if any specific IP addresses are allowed or denied, etc.
6. Checks if the credentials supplied by the client are valid. This involves looking at the back-end system for validation. It can be a back-end database or accounts configured elsewhere.
7. Checks if the client credentials validated in the earlier step is authorized to access the resource.
8. Determines the MIME type of the requested resources. This step helps to determine the content handler.
9. Inserts modules filters in the output filter chain.
10. Inserts content handler, in this example its FastCGI and gzip handler. This will generate the response for the requested resource. The response is forwarded to the output filter chain for further manipulation.
11. Each module logs a message after processing the request.
12. The response is served to the client or any other resource in the chain (load balancer or proxy).
13. If there is any error in either of the processing cycles, a HTTP error message is generated and the client is responsed with the message.
Nginx Modules: Modules are those little pieces of code that give a specific feature or functionality in Nginx. It is because of these modules that you can identify if Nginx is behaving as a web server, reverse proxy server, or a load balancing server. Hence, it is important to understand what modules are and how they formulate the Nginx HTTP request processing structure.
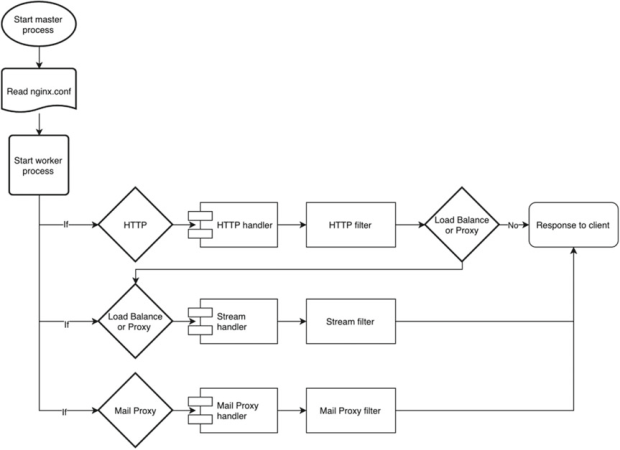
How Modules Fit in Nginx:
1. Start Nginx web server.
2. Nginx master process gets initiated.
3. Read nginx.conf.
4. Creates worker process(es), memory allocation , and other architectural specific configuration as per the CPU architecture.
5. Based on the context like HTTP , MAIL, and STREAM , it creates a list of module handlers and maps them as per their location in the nginx.conf.
6. If a request is http://abc.com , the request is processed in http context.
7. It will check for the content module handler need to process the request and the respective handler grabs the request and starts working on it.
8. Once the request is processed, the output is handed over to the filters like gzip, headers, rewrite, etc. The filters will manipulate the output further depending on their order of execution.
9. If there is any load balancer or proxy module, the respective module will further handle the output.
10. Finally, the response is sent over to the client.
Core Module:
Command: user
Syntax user <username>;
user <username> <groupname>;
Default value user nobody nobody;
Context main
Description This defines the identify under which Nginx process is started. It is recommended to use least privileged user.
Command: worker_processes
Syntax worker_processes <number>;
worker_processes auto;
Default value worker_processes = 1;
Context main
Description This defines the number of worker processes started by Nginx. It is recommended to set the value to the number of CPU cores on the server. You can also use the value auto, which lets Nginx select an appropriate value. The optimal value depends on multiple factors and you should test the performance impact in your setup before and after making changes.
Command: error_log
Syntax error_log <path/filename> <level>;
error_log memory:size debug;
Default value error_log logs/error.log error;
Context main, http, mail, stream, server, location
Description This defines the location and level of error logs that are captured. The different levels of error logging are as below (starting from detailed to specific error):
debug : detailed information; used for debugging.
info : information message, lot of details; not very useful.
notice : only notices will be logged; not very useful.
warn : warning messages; indicates some kind of problem.
error : error logs; errors while serving pages.
crit : only critical problem that needs attention.
alert : alert messages of important issues.
emerg : emergency messages when the system is unstable.
Command: pid
Syntax pid <path/filename>;
Default value pid logs/nginx.pid;
Context main
Description This stores the process ID of the master process. You may think, why save a value of a process identifier in a file? It serves multiple purposes, especially signaling that the process has at least started successfully. It is also a cheaper way to poll a file in contrast to getting the output of the ps -ax | grep command. However, please be mindful that this approach is not fail-safe. It is possible that the process is dead for long, and the PID file contains stale information.
In general, the PID files are created by daemons that should only be run once on a system. When the process starts, it also creates the lock file. As long as the lock file exists, it won’t start another process. If the lock file exists, but the process id mentioned in the PID file is not running, the daemon can be considered as dead. It may also imply a crash or improper shutdown of the daemon, in which case it might initiate a special startup or restart scenario.
Command: worker_rlimit_nofile
Syntax worker_rlimit_nofile <number>;
Default value none
Context main
Description This defines the maximum number of open files for the worker processes.
Events Module:
Command: worker_connections
Syntax worker_connections <number>;
Default value worker_connections 512;
Context events
Description This defines the maximum number of simultaneous connections that can be treated by the worker process. Keep in mind that worker_connections cannot exceed worker_rlimit_nofile if configured.
Command: debug_connections
Syntax debug_connections <address>;
debug_connections <CIDR>;
Default value none
Context events
Description This defines debug logging for selected client connection. You can specify IPv4 or IPv6 address of a client.
HTTP Module:
Command:include
Syntax include <username>;
include <mask>;
Default value none
Context any
Description This defines including syntactically correct files or mask. Instead of making a long and cluttered nginx.conf file, you can define a virtual server in a specific configuration file and include them directly in the nginx.conf file.
Example:
include conf/mime.types;
include /etc/nginx/proxy.conf;
include vhost/abc.com.conf;
include /etc/nginx/vhosts/*.conf;
Command: default_type
Syntax default_type <mime.types>;
Default value default_type text/plain;
Context http, server, location
Description This defines the default mime type of a response.
Example:
default_type text/plain;
default_type application/octet-stream;
Command: log_format
Syntax log_format <name>;
Default value log_format combined ‘$body_bytes_sent “$http_referer” “$http_user_
agent” $remote_addr $remote_user “$request” $time_local $status’;
Context http
Description This defines the log format that defines variables that are used only at the time of writing the log. Some of the variables that can be used are as follows:
$body_bytes_sent : number of bytes sent to a client as the response body, this
does not include response header.
$http_referer : identifies the URL of the page that is requested.
$http_user_agent : identifies the agent or browser that requested the resource.
$remote_addr : IP address of the client making the request.
$remote_user : Username specified if basic authentication is used.
$request : raw HTTP request URL.
$time_local : local server time that served the request.
$status : A numeric value of the HTTP Statuc Code during the response.
Example:
log_format combined ‘$remote_addr – $remote_user [$time_local]
“$request” $status $bytes_sent “$http_referer” “$http_user_agent”
“$gzip_ratio”‘;
Command: access_log
Syntax access_log <path/filename> [format];
access_log off;
Default value access_log logs/access.log combined;
Context http, server, location
Description This defines the path where logs are captured for the requests that are served by the server. When set to off, no logs are captured. The name combined implies the format of the log to be used while logging. In the log_format section previously mentioned you have seen how the log_format is named as combined with appropriate fields.
Command: sendfile
Syntax sendfile on | off;
Default value sendfile off;
Context http, server, location
Description This defines enabling Nginx to send static content directly from the kernel instead of looking for the resource on disk again. This prevents context switching and enabling a speedy delivery of resources. If you are serving static content, enabling this is essential where as if you are using the server as a reverse proxy this setting does not make any sense.
Command: tcp_nopush
Syntax tcp_nopush on | off;
Default value tcp_nopush off;
Context http, server, location
Description This enables sending response header and the full file in one packet rather then sending it in chunks. This parameter should be enabled with the sendfile option.
Command: tcp_nodelay
Syntax tcp_nodelay on | off;
Default value tcp_nodelay on;
Context http, server, location
Description This enables Nginx to send data in chunks, hence avoiding network conjunction. This option is uses keepalive option that allows you to send data without initiating a new connection. This option is the exact opposite of tcp_nopush option you saw earlier.
Command: keepalive_timeout
Syntax keepalive_timeout <number>;
Default value keepalive_timeout 75s;
Context http, server, location
Description This option sets a timeout value for a connection to stay alive. If you set keepalive_timeout to zero it will disable keep_alive .
Command: listen
Syntax listen <address>;
listen <ip_address>:<port>;
Default value listen *:80;
Context server
Description This option sets address, IP address, or port on which the server will accept the request. You can use both IP address and port or port or address (i.e., URL or hostname). If you set a default_server with an IP address or address, it will become the default server for the specified address or port.
Example:
listen http://www.abc.com ;
listen 127.0.0.1:8080;
listen localhost default_server;
Command: server_name
Syntax server_name <address>;
server_name *.<address>;
server_name _;
Default value server_name “”;
Context server
Description This option allows you to set the address using either an exact name or wildcard or a hash table to the listen port. Setting up a hash table enables quick processing of static data like server name, MIME types, request header strings, etc. Hash table uses the ngx_http_map module. Using a wildcard enables having multiple URL’s using the same domain name. The catch-all server parameter “_” is used when no valid domain name exists.
Example:
server_name http://www.abc.com one.abc.com;
server_name *.abc.com;
server_name _;
Command: root
Syntax root <path>;
Default value root html;
Context http, server, location
Description This option specifies the root location of the web content.
Command: error_page
Syntax error_page code uri;
Default value none
Context http, server, location
Description This option allows you to set the URI for a specific error.
Example:
error_page 403 http://www.abc.com/forbidden.html ;
error_page 500 501 502 /50x.html;
Command: try_files
Syntax try_files file uri;
Default value none
Context server, location
Description This option tries to look for the existence of the file specified order or looks at the literal path you specified in the root directive and sets the internal file pointer. In the below example, when a request is made a try_files directive will look for index.html, index.php in the /website/root_directory. If it fails to find it, it will look into the $document_root directory specified at the root directive and serve the request.
Example: try_files /website/root_directory/ $uri;
